new and used avionics
 Sell Your Avionics Here
|
Avionics List
new and used avionics |
Sell Your Avionics Here
|
Buying Safety Tips |
Avionics Articles and Reviews
|
Nowadays everyone wants a moving map along with their GPS. True the handheld units have a map but in
most cases the LCD is difficult to read . The wires and yoke mount are also a hassle. Why
doesn't someone come out with a good easy to read moving map/GPS that is panel
mounted? Sure, King has a couple of models but in my opinion the moving map is a joke. In
the early years King 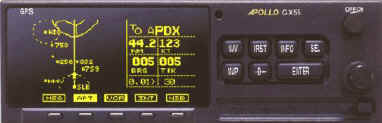 didn't advertise that their panel mounted units
had a moving map. Only after the words "moving map" became popular did they use
that term. OK, lets go one step better. How about a easy to read GPS/moving map that has
the same wiring as the loran that is being removed and the rack is the same size as the
loran, thus making installation a snap, and you want it certifiable for IFR enroute
and terminal areas? I am happy to tell you; IIMorrow saw the light and introduced the new
GX55, designed as a rack compatible replacement for most of their panel mounted lorans.
The wiring is the same. If your loran drives your autopilot and/or HSI, then the
replacement GPS will drive the same equipment. In other words, slide out the loran and
slide in the GX55. There is a one catch. The loran antenna must go away and the GPS
antenna must be installed. More on this when we install one in a Cessna later.
didn't advertise that their panel mounted units
had a moving map. Only after the words "moving map" became popular did they use
that term. OK, lets go one step better. How about a easy to read GPS/moving map that has
the same wiring as the loran that is being removed and the rack is the same size as the
loran, thus making installation a snap, and you want it certifiable for IFR enroute
and terminal areas? I am happy to tell you; IIMorrow saw the light and introduced the new
GX55, designed as a rack compatible replacement for most of their panel mounted lorans.
The wiring is the same. If your loran drives your autopilot and/or HSI, then the
replacement GPS will drive the same equipment. In other words, slide out the loran and
slide in the GX55. There is a one catch. The loran antenna must go away and the GPS
antenna must be installed. More on this when we install one in a Cessna later.
The GX55 is manufactured by IIMorrow in the good ole USA. The display is electroluminescent which is nothing new in aviation but you just don't see this type of display often offered in the price range of the GX55. A photocell controls how bright the display is. You power the GX55 up by turning the off/on switch. For some reason the off/on switch rotates much like a volume pot and pulls in and out but none of these functions do anything. Maybe they reserved this for future use or maybe they had a bunch of these type switches around and decided to use them up, who knows. Under the display hosts five "Smart" keys which do some great things that we will discuss later during the operation phase. The main key board host the same familiar push buttons if you have used a IIMorrow GPS in the past. My favorite button is the "Direct" button. Push it, select the airport and push enter. Now you're on your way to wherever you want to go. The GX55 has a datacard that just pops out the at the push of a button, just like the high end GPS units. The datacard is updatable every twenty eight days and covers the Americas. The card has the airports, VORs, NDBs, Intersections and special use airspace. Of course the GX55 will internally accept 500 custom waypoints created by the user, 35 flight plans can be saved with up to 20 legs. The flight plan is reversible too which is a nice touch. The display is 160x80 pixels. I'm not sure what that means but the display is easy to read. The GX55 has a clock and count-down timer. The receiver is a parallel 8 channel. The new IIMorrow has standard left right outputs, to/from, nav invalid and RS-232 bi-directional serial port.I can sit here all day and spell out the dozens of features the manual says the GX55 has but you can read that from a brochure and the manual. What you will get from me is a avionics manager's and pilots overall view point of the GX55. Is it user friendly? How well is it built and can you see it in the daylight? Is this thing a lame duck like the 604 loran? Keep on reading, the answers are on the way! Now that you have some idea what this thing fits and some of the functions, lets get one out of the box evaluate it then install it.
We pulled the invoice off the box and ripped it open. This is not a demo model, it's one that was sold to be installed in an aircraft. I refuse to write about products only using a demo model. The GX55 was packaged well, making damage in shipping extremely unlikely. The parts and the GPS were packaged in nice anti-static bags. We inventoried all the parts and found everything to be present. The GX55 even comes with it's own allen wrench to remove it. The case is made out of sheet metal and the front bezel is metal. All the buttons and knobs feel like buttons and knobs should feel. I've found this to be true throughout the IIMorrow product line. My next feat of magic was to see if I could disassemble the thing without destroying it to find out what was inside. I couldn't believe it, less than half of the case is utilized! There's hardly anything inside at all. One large PC card, a small card and the display card. The only reason for the large case is so it will fit the loran rack. The PC boards are all surface mount. If you ever have a problem with the GX55, send it back to the factory. You definitely don't want to work on surface mount with a blow torch and nail. The lithium keep-alive battery is not soldered to the board so anyone could change it years ahead when it gets weak. Early model GPSs had the battery soldered to the board, thus the unit had to be returned to the factory for replacement, not so with the GX55. The PC boards proudly represent high American built quality. I do wish they would have installed a fuse that one could easily change. I'm sure the circuit boards are protected but a big fuse would have been nice. Another big plus is you don't need forced air cooling with the GX55. I noticed after reassembling the GX55 that fit and finish were good. No jagged edges, machine screws were used, again showing quality. I found 3 different QA inspectors stamps just on the case. It appears someone is interested in quality. The unit serial number is attached with a sticker instead of being hard mounted to the case. True, the GX55s serial number is in the software but I personally like it when the serial number can't be removed from the case.
I glanced at the manual just to see if it was written in plain English. The user's guide is easy to read and the operation steps make sense. The manual even comes with a quick reference guide, what I call a "cheat sheet". From what I saw of the manual, the only time you will need it is when you first tell the GX55 where it's located and when you use the flight plan mode. Everything else is bone-head basic. Finally after all these years, manufacturers are letting operators write the user's guide, not software engineers. The manual has a troubleshooting guide in the back and IIMorrow's "800" number should you have a question that can't easily be figured out.
Now it's time to plug the GX55 in to the power supply. By the way you can order a cable/connector from IIMorrow (p/n 500-4027) and plug it into any 10-40Vdc power supply and run the flight simulator from home. This is a very easy way to get used to the GX55. The moving map operates in the flight simulator also and you will see fixes go and come along with special use airspace. I've found it's much easier to learn new equipment at home. Pushing buttons with my head buried in the cockpit isn't the way to learn. Take it home and fly it! In the flight simulator mode the GX55 will fly flight plans and warn you about special use airspace just as if you were in the flying machine. The only thing that doesn't work is the remove lights and outputs going to the indicator if your aircraft has this already. Now we turn on the GX55 and already I like it. The display is outstanding in this room. I held the "nav" button as I turned on the GX55, this places the unit in the "Flight Simulation" mode. The GX55 lets you know in no uncertain terms that you are in the simulator mode "NOT FOR FLIGHT" It then makes you push a couple buttons so to set in a ground speed and altitude. Now all you do it tell the GX55 where you want to go and you're off. The "Nav" pages show you all the normal things such as a CDI indicator, ground speed, waypoint, ETA, ETR, track, bearing, UTC and just about anything else you could desire. I found the UTC display to be a great tool in IFR conditions, no more adding with the watch. There's even a page that shows you the MSA and MESA. This can be very handy in flight planning I've found. If the MESA is 16,500Ft for your trip and you are flying a Cessna 150, then you may plan another route. What this means is to clear all the terrain by 2000Ft, you must fly at 16,500Ft. I think you too will agree this could be very valuable during flight planning. One can set the GX55 flight timer to start at any airspeed you desire and time your flight. In other words, if you have the GX55 set to start timing your trip at 60Kts, then when the aircraft reaches that airspeed, the internal timer will start. The timer will stop counting once you are under 60Kts. I wonder if the timer will work in spins going straight down at 120Kts? Another neat feature of the GX55 is the ability of customizing each nav page. You can make each page show what you want to see. If you want the CDI, ground speed and UTC, then you can customize it that way. You can also have the unit "Autonav" between navigation pages. While this may sound great I found it annoying. Whenever I was looking for a piece of navigation data, that page wasn't present. I had to wait until it scrolled up. My bet is you will set up several custom navigation pages the way you like them and use those. I found I could get all the data I normally needed on one page, thus never having to change the nav. page. The "Direct-To OBS" might be handy in some cases. Pressing the "Direct" button twice starts the Direct-To editor. At that point you can put in the bearing to the waypoint you have selected via the small and large knobs. Once you've put in the OBS you want to fly, you would need to intercept that bearing. This is much like tracking a VOR. At anytime in the navigation mode one can press the "INFO" mode and get any data about the waypoint they have selected. This "INFO" mode will give you all the frequencies, runway lengths, runway lighting, ILS frequencies, field elevation, available fuel, Lat/Lon and a place to enter comments about that waypoint. You could put in phone number of the local taxi or mention in the comment section no fuel is available after 6:00 PM or whatever you want to remember about that waypoint. If we press the "NRST" button we will first get the nearest 20 airports then by turning the large knob we will see the nearest 20 VORs, NDBs, intersections and user defined waypoints. Fix will come up. The fixes are shown with relationship with distance from the aircraft. In other words the 20th airport shown is the farthest of the 20. A arrow also comes up on the screen that points in the general direction of the fix thus giving the pilot a quick reference of the direction to turn the aircraft toward. Of course the bearing and distance show up with the arrow. The pointing arrow could save valuable seconds in an emergency. This all shows up on the screen in the flight simulator mode. The pilot can also get any information about the airport in the "NRST" mode by pushing the "INFO" button. If you want to go to one of the fixes in the "NRST" section simply press "Direct" and enter. I found the information in the "NRST" section handy and easy to use.
While in the "NAV" mode some of the "Smart Keys" are ready to use. By pressing the "DB" Smart Key one can create a waypoint by radial and distance from just about any fix. This works much like R-Nav in yesteryears. This feature could be handy creating your own user defined waypoints. Also by using the "DB" smart you can delete a waypoint or modify user defined waypoints. Nothing earth shattering here but some nice touches. By pressing test "FPL" Smart Key, one can enter a flight plan, modify it, or do just about anything you would want to do with a flight plan. You also can activate a flight plan in this area should you desire. One thing I noticed about the GX55 is most features have several ways to access them. That's good because you can often just stumble on to what you are looking for! The other Smart Key that is available is the "SYS" button. This is the area where you set up your navigation pages if you don't like the pre-set ones and fight timer. You can also install your name and give the GX55 a password should you desire. The CDI scaling is adjustable in this area also. I highly recommend not using the Smart Keys in the navigation mode unless you are on the ground in the demo mode. These keys are mainly designed to set up fixes or fine tune the software to your personal needs. Do this on the ground while in the flight simulator mode, not in the air!
IIMorrow should be required to issue a "Warning" message before you use the MAP button stating that if you see the map features, you will buy the unit. Friends, it's that good. The map is much like the Argus 3000 with a course line! All you do is keep the aircraft on the line and maintain airspeed. In my opinion the moving map in the GX55 is easier to read than the Argus 3000. Now here's where things get even better. The Smart Keys in the MAP mode show APT, VOR, INT, NDB. I'm sure you know what they stand for. Lets say you push the "APT" Smart Key. The airport fix along with the identifier of that airport will appear on the screen. If you push the APT button again, only the outside edges of the button are lit. What happens on the screen is; the identifier goes away but the airport fix is still there, thus decluttering the screen. If you push the APT button again, only the outline of the switch is lighted. The screen then removed all airport fixes, again decluttering the screen even more. The same happens with all the Smart Keys. In most moving maps you have to go into some operating route to declutter the screen but the GX55 gives the pilot the options to declutter as much or as little as they desire with just a push of a button. The special use airspace is always shown on the screen. You can change the range of the moving map simply by just turning the small knob on the front panel. The range goes from .1 mile to 250 miles. Auto range is available but I wasn't thrilled by it. You can have the GX55 warn you when you approach special use airspace in the set up mode. This is a great feature and easy to use. The "MSG" Smart Key will flash if there is something you need to know such as bumping into special use airspace or the satellites die. By turning the large knob on the faceplate I can get moving map and navigation information at the same time. In this mode the Navigation window will show me the waypoint we are flying to, distance, ground speed, bearing and track and distance off course while on the left side of the screen the moving map is present. True the map is smaller in this mode but again, we can declutter the screen by using the Smart Keys. You can also remove the course line on the moving map but I don't know why you would do that. Just keep the aircraft on the line and look out the window, it's so simple. We only touched on about 50% of the features but I did hit the main ones.
Now let's see what it "really" takes to install the GX55. IMorrow said the GX55 was rack compatible with the prior panel mounted lorans they built. If you don't have an Apollo loran in your aircraft, you can purchase a installation rack and have the GX55 installed. Our first sale was going into a Cessna R-182 that had a 618TCA loran install with a top mounted antenna. I told the customer to allow three hours for installation because I really didn't know what I was getting into. Things often aren't as easy as they seem. We removed the 618TCA from the rack with a screw driver and the GX55 slipped into the rack and tightened down with the supplied allen wrench. What a difference in weight! The GX55 only weighs 2.6 pounds, the Loran weighed over 4 pounds. Obviously the weight and balance will have to be updated. Now for the antenna. We had to remove some of the overhead to get to the nuts that held the antenna screws on. This was a two person job, one to hold the nuts and one to turn the screw. IIMorrow was thought smart, the foot print for the GPS antenna is the same as the loran antenna, thus no holes had to be drilled. We installed the new screws in the GPS antenna and torqued it down. The loran antenna used what we call a BNC fitting but the GPS antenna required a TNC fitting. The kit comes with the proper fitting to hook your present coax to the TNC GPS antenna fitting. We put on the fitting and reinstalled the overhead. We fired up the GX55, told it the time and location and within 4 minutes it was up and working. Now back inside the shop to revise the weight and balance and complete the 337 form. By the way, we gained about 3 pounds of useful load. Total install time was less than an hour. Now had the loran antenna been on the bottom of the aircraft the installation could have taken many hours because the GPS antenna must be on top of the aircraft, no exceptions.
We requested a test flight after installing the GX55, mainly because I'm always looking for an excuse to fly but also to verify the GPS would work with the Cessna autopilot. Up and away we go. The GPS gave me a bearing of 335 degrees to my waypoint, I set the autopilot up for nav and engaged it. The HSI needle centered up and the autopilot kept it centered. So the GX55 outputs will work the same as the removed loran did. Later I turned the aircraft so the sun would be directly on the display to see if it would wash out. It didn't. The GX55 display is one of the best on the market. The LCD and LED units aren't even in the same league. I'm not convinced the CRT displays are any better especially if you take price into consideration. I went directly to an intersection and had ATC verify I was at that fix. I shot the ILS in VFR conditions and saw the runway come up on the moving map of the GX55. True, you can't use it for approaches but seeing that runway in front of me on the moving map was a good feeling. We landed and reluctantly gave the owner the aircraft. Later that week I called and asked what he thought of the GX55. He loved it and is still blown away by the performance for the dollar. All my customers have been very pleased with the GX55 and the features it presents. If my customers aren't happy with a product, then I don't sell it. If anyone gave a product of the year award, I feel IIMorrow deserves it with the GX55. It's easy to read and use plus the customers love it. That's what it's all about.
POINT: Finally manufacturers are waking up and selling people what they want. Removing an outdated loran and installing a GPS with a moving map that slides in the same rack is great! It's easy to read and operate for the low price of $2,995.00. (To install a Argus moving map with a IFR approved GPS would run over $8,000.00.) The Operators manual is in plain English and it has buttons and knobs that feel like they should. Let's not forget the GX55 is a quality USA product and has easy to operate decluttering features and a datacard that can be upgraded by the owner. What more could you ask for?
Counter Point: IFR approvable? Give me a
break! less than 1% of IIMorrows lorans were ever certified for enroute. This would mean
you would have to wire the aircraft for IFR which could run into thousands of dollars. If
the loran antenna is on the bottom of the aircraft, the installation of the GX55 could be
very expensive. Owners can't install it because a 337 and the TNC fitting is
required.